google draw lines on 3d map
Create a map or story in Google Earth Web
Tutorial Contents
-
Prerequisites
-
Let'due south Become Started!
-
Create a project and add places
-
Adding a place from Street View
-
Preview your finished project
-
Add rich information to your places
-
Adding photos, videos and text
-
Previewing changes
-
Styling placemarks
-
Adding 3D views
-
Changing the Info box
-
Add information to your second placemark
-
Adding videos
-
Add lines and shapes to your projection
-
Depict a line
-
Draw a shape
-
Add slides to your projection
-
Share your projection
-
To share a link to the project
-
To share the project with specific people for viewing or collaboration
-
More with Earth cosmos tools
-
Viewing your projects on web and mobile
-
Pinning Projects
-
Importing your KML files
-
Exporting KML
-
Word and Feedback
-
What'south Next
Prerequisites
- No programming skills needed!
- A Chrome browser (download here), logged into your Google Account. Don't have one? Sign up here.
Let's Get Started!
The new creation tools in Google Globe let y'all to easily create and share maps and stories about our world as an Earth projection. You can create a project on whatever field of study of your choosing, drawing placemarks, lines and shapes, calculation rich contextual information to your places (text, links, images, videos, 3D views and Street View), and organizing your project into a narrative flow. Y'all can share your project and interact with others. In presentation manner, viewers will wing from one identify to the side by side post-obit the narrative of your project, immersing them in the journeying through Google Earth's imagery and the custom content you provide.
This tutorial will introduce you to the new creation tools, and walk you through the procedure of creating and sharing your own Earth project. In order to complete this tutorial, you will need some text, photo and video content to add to your project. You can use your own content or you tin can use the sample content provided by our friends at the Jane Goodall Found (JGI). Download the zip file below for the JGI images and extract the contents to a folder on your desktop.
JGI_sample_content.zip (249k Zip file)
If yous choose to follow forth with our Jane Goodall example, y'all may want to preview the finished sample Jane Goodall story before y'all start the tutorial.
Create a project and add places
- Open up Google Earth on your figurer: https://earth.google.com/web
- Click on the Projects
icon in the left-hand navigation.
- If you've never created a Project before, you will click the Create push to create a new project. If you've created Earth projects before, then you'll come across a list of your projects and can click the New project push to create a new project. If you lot're not already logged into your Google account, you'll be prompted to practise so.
-
In the Projection Details console, click the Edit button
to the right of Untitled Project to edit the projection's title and description. In this case, nosotros've supplied some text below for you to copy and paste into these fields.
Projection Title:
Jane Goodall's Journeying to GombeClarification:
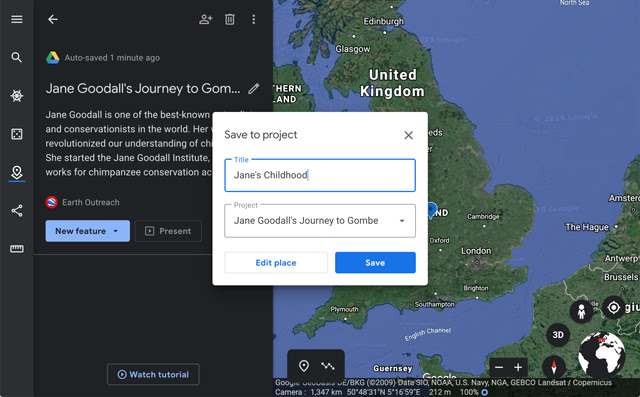
Jane Goodall is one of the best-known naturalists and conservationists in the world. Her work revolutionized our agreement of chimpanzees. She started the Jane Goodall Institute, which works for chimpanzee conservation across Africa.You'll observe that your edits are automatically saved in Google Drive as you piece of work.
-
At present it'due south fourth dimension to add together your first place to the map. There are two ways to add a place: dropping a placemark on the map or using Search to discover a place. First, we'll try adding a placemark to the map:
Navigate around the globe until you see England. Now, click the Add placemark button in the creation toolbar at the bottom left-hand to activate the placemark tool.
And then click on the map, on England, to add the placemark.
Tip: If you are non seeing state and other identify names on the globe, try changing your Map Manner. Click on the Google Earth menu button
and select Map Style. Change your Map Style to Exploration so that you tin can see identify names on the globe.
-
In the Salve to projection box, click into the Title field and name your placemark "Jane's Childhood". The Projection field should be gear up to "Jane Goodall's Journeying to Gombe". Then click Salve.
You should see your titled placemark appear in the list of features in the Project Details panel.
-
At present let's add a placemark using the 2d method: the Search tool. Click the Search icon in the left-hand navigation and search for "Nairobi National Museum". Click on the get-go search result.
-
On the Nairobi National Museum Cognition Bill of fare at right, click the Add to project button.
Click Save to add the second place to your project. Yous can close the Cognition Card by clicking on the X in the top-right corner.


Adding a place from Street View
- At present let's add a tertiary and terminal identify - this time a identify in Street View! Use the Search tool again to wing to "Gombe National Park", merely close the Noesis Card without calculation it to the Project.
- Click on the Street View pegman in the bottom right corner. Blueish lines and dots will appear wherever Street View imagery is available. Click on the bluish line or dot to enter Street View on ane of the forested hills in the park.
-
Navigate through the Street View until you observe the view you'd like to add to the place. Click the Capture this view button.
-
Championship the placemark "Gombe National Park" and save it to your projection.


Preview your finished projection
-
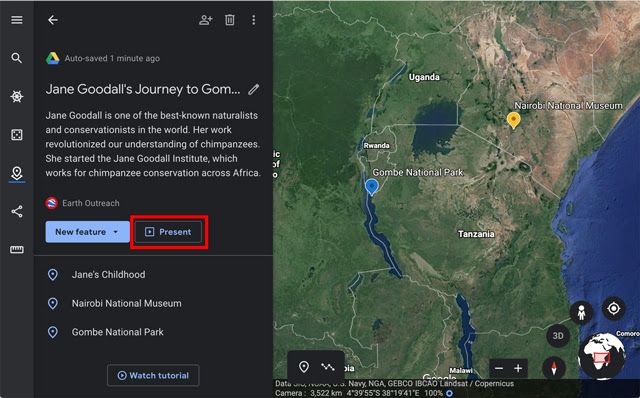
Click the Nowadays push button to see your project presented in a narrative format.
-
Click adjacent and previous buttons in the Tabular array of Contents at bottom left to fly to each feature in your projection. Click the dorsum push button
- the pointer in the top left corner - to exit the presentation.
-
Tip: Yous can also drop a placemark on the globe by clicking the New characteristic button and select Add placemark.
-
Tip: To change the narrative social club of your project, go to the Project Details panel and reorder the feature listing past clicking and dragging the features into a new guild.
-
Add together rich information to your places
Adding photos, videos and text
-
In the Projection Details panel, hover over the start feature in your project and click the Edit button
to open up the Property Editor panel.
-
Click on the Camera push.
Here you will see options to upload an image from your computer, choose a photo from your Google Photos albums, search the spider web for images, select an epitome by URL or add together YouTube videos.
Using the search option, search for images of Bournemouth (Jane'southward babyhood home) and select ane that you like. Click Select to see the image announced with a thumbnail view in the Belongings Editor panel.
-
Click the camera button again to add a second photo. Search for and add a second photograph. Calculation multiple photos volition create an image carousel in your Info box.
-
Click the Description field and re-create and paste the below text. This box has basic formatting options available, including assuming, italics, underline, bullet lists, indentation, and hyperlinks. Text starting with "http.." will automatically be hyperlinked.
Jane Goodall grew up in Bournemouth, England. Growing upwards, she was fascinated past all kinds of animals. When she was immature, her favorite books wereDr. Dolittleand the Tarzan series. All she wanted to do was go to Africa, find the incredible animals living there, and write books well-nigh them.


Previewing changes
Click the Preview presentation button to run across your changes in presentation mode. Click the dorsum button 

Styling placemarks
- Ringlet down the Property Editor panel and observe the Placemark section. Click on the placemark size and change the size to Big.
- Click on the paint bucket icon to change the placemark color to yellowish.
-
Click on the placemark overflow menu
and select See more than icons. Search the icons using the word "volume" and select the volume icon to represent Jane's childhood.
Tip: You can too add a custom icon (your own icon image file) by clicking the placemark overflow menu

Adding 3D views
Now that we know Jane grew upward in Bournemouth, allow's brand the view in Globe of Jane'southward childhood more than specific and immersive.
- Click on the placemark and drag the marker to Bournemouth (just west of Southampton along the southern coast of England). Yous may need to zoom and pan the map to get a ameliorate view of the town.
- Now, tilt and rotate the Globe'south surface using the compass or keyboard shortcuts until you find a view of Bournemouth that you similar.
-
Click the Capture this view button. This assembly this 3D view with your location, and in presentation manner when you lot visit this location, the map volition fly to this view.

Irresolute the Info box
Yous tin can modify the style of the Info box that displays your content (text, photos, videos, etc).
- In the Holding Editor panel click the drop down arrow on the right-side of the Info box and change the Info box from Pocket-size info box to Large info box.
- Click the Preview presentation button to see the changes. Determine which style you similar best!

Add information to your second placemark
Now let'southward add together information to the other placemarks in your projection.
-
Click the back push button
to get back to the Project Details panel.
-
Hover over the 2d placemark and click the Edit button
.
-
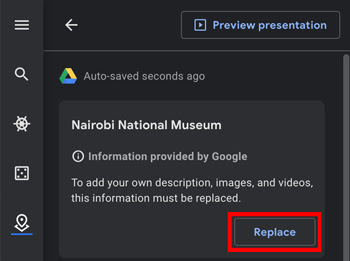
Since we added this placemark from a Knowledge Card, it displays data from the Google Knowledge Graph (you can click the Preview presentation button to run into the default data displayed). You could choose to keep the Knowledge Card information as is, or you tin can click "Supervene upon" in the Property Editor panel to delete this information and then add your ain content. In this case, let's delete the Google information card content.
-
Continue the title "Nairobi National Museum" given past the Knowledge Graph, but add a new description to this placemark:
In 1957, on a visit to Kenya, Jane met the famous anthropologist and paleontologist Dr. Louis Leakey, and was hired as a secretary. Dr. Leakey was looking for someone to begin a written report of chimpanzees to proceeds insight into man beings' evolutionary past. -
Add an image past uploading the file titled jane_and_leakey.jpg (found in JGI_sample_content.naught) from your reckoner.
-
Set a 3D view and click the Capture this view push button.
-
At present edit your tertiary and last placemark, Jane's Peak. Add the following clarification:
Jane Goodall arrived in Gombe in July of 1960. The area was located in what was and so the British protectorate of Tanganyika. It was unheard of at the time for a young woman of 26 to travel into the forests of Africa alone. Armed only with her binoculars and a notebook, Jane would climb to Gombe's highest acme in search of the chimpanzees. Over the years, Jane's research led to many new discoveries, for instance that chimpanzees know how to brand and apply tools, like humans do. Her enquiry squad has studied the behavior and followed the lives of the chimpanzees of Gombe for many decades now.

Adding videos
-
While however in the Property Editor panel for the third placemark, click on the camera button and select YouTube. You may search for a YouTube video or y'all tin can access your public YouTube videos. If you have an unlisted YouTube yous'd similar to add, you can enter its URL in the search box to select it.
-
Search for "jane goodall termite fishing" and select the kickoff search event to add the video to the identify.
Add lines and shapes to your project
Describe a line
-
In the Project Details panel, click the New feature push button and select Depict line or shape (Notation: You lot tin can besides click the Draw line or shape button in the cosmos toolbar at the bottom of your screen).
-
On the map, click to add a serial of points to describe the line. Each time you lot click, a new segment is added to your line. To finish your line, press enter. For the Jane Goodall project, you might draw the path that a boat would take to become from the nearest city (Kigoma) to the research station in Gombe.
-
In the Add to projection box, name your line and click Edit identify.
-
In the Width and color department, click on the width dropdown and change the line width to 8 pixels.
-
Click on the color palette to select cherry for your line color. Alternatively click Custom colors to create your own color swatch (Note: the hexadecimal code can be edited directly for exact web color matches).
-
Zoom out to then that y'all can see the entire line and click Capture this view.


Tip: If you open up the Property Editor console for your line, you volition be able to drag and move your line points to reshape your line, but you can't delete or add together segments.
Draw a shape
-
Now, we'll add a shape. In the Projection Details panel, click the New characteristic push button and select Draw line or shape.
-
On the map, click to add a serial of points to draw your shape. Each time y'all click, a new segment is added to the outline of your shape. To finish your shape, click once more than on the first point that was added to close the shape. For the Jane Goodall projection, you might describe a shape effectually the enquiry station in Gombe.
-
In the Add to Project box, name your shape and click Edit place.
-
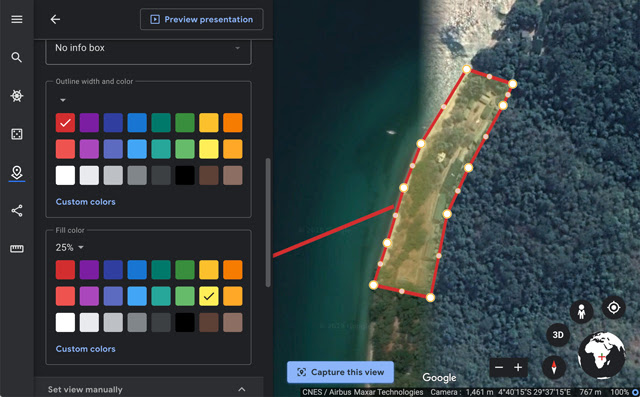
In the Outline width and colour section, change the outline to crimson.
-
In the Fill color department, change the fill colour to yellow. You tin can also alter the transparency using the drop down card higher up the color palette.
-
Conform the view and click Capture this view.

Tip: You lot can reshape your polygon by clicking and dragging points, just y'all can't delete segments. You can not click and drag your unabridged shape to a new location.
Add slides to your project
-
In the Projection Details panel, click the New feature button and select Fullscreen slide.
-
Give the slide a championship and description.
Jane Goodall'south Journeying to GombeThis is the story of Jane Goodall and her groundbreaking inquiry with chimpanzees in Gombe National Park. -
Add an image by selecting the Photographic camera button, then Upload and selecting the file entitled jane_peak.jpg (found in JGI_sample_content.nix) from your computer.
-
Click the back push
to get to the Project Details console.
-
Click on the slide in the feature list and drag information technology to the superlative of the list of features.
-
At present click the Present button to see how your new slide introduces your project.

Tip: You lot can add slides to innovate your project, create capacity or sections, to add an ending message or credits and more.
Tip: If you cull to use an image as your slide background, your title and description will appear at the lesser lefthand of your slide. If you lot choose to use colour every bit your slide background, your title and description will appear centered on your slide.
You have many options when you want to share your Globe project with others. All projects are private by default — only you lot as the creator of the projection can view or edit it. Below you'll acquire how to share the projection, as well equally how to interact on your project with others.
-
Click the Share button on the Project Details panel.
-
Click Get shareable link.
-
Copy the link. You can now share this link with others so that they can view your project. Note: if you turn link sharing on, anyone who the link is shared with can view your project. If you'd like to control access permissions by Google account then you will likely want to use the method described direct below instead of turning link sharing on..


Tip: By default, people with the link will only be able to view your project. If you'd like, you can alter the permissions so that anyone with the link can edit your project.
-
Click the Share button on the Project Details console.
-
Under People, type in the email addresses of the people you'd like to share the map with directly, or cull from your contacts, and click Done. You can select whether the people you invite can edit the projection or just view it. If a person does non have edit access, they volition not see the Edit buttons in the Projection Details panel and thus will non take admission to the Property Editor for whatsoever features in the project.

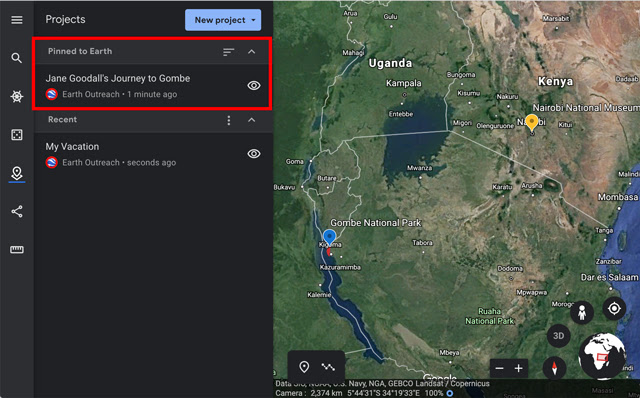
Viewing your projects on web and mobile
Y'all can detect maps and stories you own and that have been shared with you by clicking on Projects in the navigation and looking through the list in the Projects panel. In the list, y'all'll encounter maps and stories organized by the categories Pinned to Earth, KML files and Contempo. Yous can also use the New project push button to open projects and KML files that practice non automatically appear in your Projects listing. You can likewise open an World project direct from Google Drive, or from a shared link.
You tin can view your projects on a mobile device past opening the Google Earth app, clicking the bill of fare in the upper lefthand corner and selecting Projects. You can not edit your projects on mobile at this fourth dimension.
Pinning Projects
In social club to ensure that a projection always appears in your list of projects (even if yous haven't recently opened it), hover over the projection in the Projects panel and click the pin icon. The project will now appear in the Pinned to Globe section on your device.,
Tip: Pinned projects are e'er visible on the globe (unless you toggle off visibility using the Hide project button), fifty-fifty when you're exploring a dissimilar project in presentation fashion. You can use this feature to "mash upwards" several different projects and/or KML files together.
Importing your KML files
If you've already created a map using another mapping tool such every bit Google My Maps, Tour Builder or Earth Pro and saved it as a KML or KMZ file, you can import the KML or KMZ to view and edit in Google Earth (with some limitations):
Currently, you are able to import your KMLs only as local files. Local files are projects stored in your local browser storage on your figurer. Local files are not stored in the Google Cloud. Local files cannot be shared with others and cannot exist shared beyond devices. Local files are stored only in the local browser storage on the calculator used to import the file.
Before you can import your KML files, you must turn on KML import in your Google Globe settings.
-
Click the Google Earth carte button
and select Settings.
-
Scroll to the bottom of the Settings card and toggle the setting for "Turn on KML file import" to on.
-
Click Salvage.
Now yous tin import a KML file.
- Go to the Projects panel and click the New projection button. Earlier you turned on KML file import, clicking this button just immune you to create a new projection or open a project from Google Drive. At present yous will run across options to create a KML file and to import a KML file from your calculator or Google Bulldoze.
- Select Import KML file from computer.
- Select the KML file from your reckoner and click Open.
- Your KML file will appear in your Projects panel. Y'all can now explore and edit your KML.
Tip: Y'all may feel some issues importing more than circuitous KML files. For example, some advanced KML features currently don't work well or at all in the new Google Earth for web and mobile, including 3D models, tours, tracks, time-based KML, and photo overlays. Besides, very large KML files or complex features (eg: polygons with many vertices) may not import or render well.
Tip: If you create or import KML files, yous will non be able to catechumen them to Earth projects (stored in the Cloud), so you will not be able to share your KML files with others.
Exporting KML
To export a KML of your project, get to the Project Details console and click the overflow menu 
Give-and-take and Feedback
Take questions about this tutorial? Want to requite usa some feedback? Visit the Google Earth Assist Community to discuss it with others.
What's Next
-
Meet all tutorials.
Source: https://www.google.com/earth/outreach/learn/create-a-map-or-story-in-google-earth-web/
0 Response to "google draw lines on 3d map"
Postar um comentário